Sunday, February 8, 2015

Sewing With Fleece - The Wigi Way Part 2

I realized I had a lot of fleece left over from the cat bed I made and blogged about last week but I didn't know what to do with it.  Then my DH asked me a very important question.  "Do you have any of that fleece left over and if so, can you make a pillow for me?"

Brilliant!  What could be easier than a pillow, right?  Well, you would think that at my age I would know how much I underestimate things.  But noooooo, not me.  I made the commitment, now I have to follow though.

I started to research it.  I knew I wanted to make what is called an 'envelope pillowcase' since it would involve a little bit of stitching and no zippers.  I Googled it and found some patterns and tips I could use.  I also didn't know if I had enough of the left over fleece material, so I got some remnant fabric just in case.
The original Pirate material is on the left and the right side is the remnant fabric I picked up.
I also got 2 pillow forms.  One was rectangular and the other was square. Here's the rectangular one.


I had an inspector come though to approve my work.  Here's a picture of him too.
Here's TC (aka "The Cat")
Both pillows I made were cut into 3 pieces, one piece for the front and 2 pieces for the back.  The back 2 pieces would overlap.

Here I pinned the hem that would overlap in the back of the pillow.
There actually is a right and wrong side to fleece.  You can see here the 'right' side is more vibrant and the pattern is more clear.
I did the same thing for the other material and here are the results of my project.

First, the rectangular Pirate pillow:
Pirate Pillow Front

And back:
Pirate Pillow back


Square Domino pillow front:
Domino pillow front

Square Domino pillow back:
Domino pillow back

Once I got the hang of it, things went smooth.  This is a super easy project to do and it made DH happy, which was my goal all along.

Sunday, February 1, 2015

Sewing with Fleece - The Wigi way

During the holidays Joann Fabric always has sales going on.  The particular time I was there the store had a sale on Simplicity patterns & fleece and I found the perfect combination for both.  You see, we got a cat from the local Humane Society and with winter here on the frozen tundra I wanted him to be nice and warm.

When looking at the different fleece patterns I had originally thought to have a 'pet' theme but they all looked to prissy.  Our cat is a tough guy, so I went with the appropriate themed material.

As a side note, it took us a while to name him since I wanted to see what his personality would turn out to be.  We ended up naming him TC, why?  Well, it was what we were calling him anyway.  You know - "The Cat".  :-P

So I got the pattern below.  I actually reviewed it on Amazon too.

 Simplicity Pattern 2297

When I selected this pattern to make I thought, "Well, it's simple enough and since it's 'no sew' it should be easy." Ha! Let me just say that once you get the pattern cut out, you have a lot of work to do before you even start putting it together.

You will need:
  • Fleece material
  • Scissors
  • Pins
  • Awl
  • Hammer (yes, that's right a hammer)
  • Marker
  • Fiberfill
I got some fleece fabric which always is on sale around the holidays. I washed it and then found a place big enough to lay out the fabric for cutting. (Note, I always fuse my pattern to some light Pelon interfacing as the pattern holds up better that way) I pinned the pattern on top and cut out my chosen view. Next I had to mark the pattern and make holes in the fleece. Do you know how hard it is to make a teeny tiny hole in this material? I swear to God it's like steel! You have to punch holes in the fleece so that you can thread it with the fleece strips you cut to draw up the fabric. 

What to do, what to do? So I asked my husband if he had any ideas of how to do this without me marking up my cutting surface with little punch holes. He gave me a piece of 1x2 wood to put under the fabric so that when I punched holes in it with the hammer and awl, my cutting surface wouldn't suffer. I also left the wood under the fleece so that my Sharpie marker wouldn't mar my cutting surface either.

Let me tell you that this project (for me) was an experience in patience. It seemed like there were a bazillion holes to punch and mark. Not only did I have to mark the holes, but I wanted to make sure I could see the mark from either side of the fabric. It wasn't a little dot here and there I had to saturate that hole. This paid off for me when the weaving part started. If you think you can skip any part of the 'making a hole or marking a hole' think again. 1) Punching the hole is a 'must do' because you have to weave that fleece strip through it and 2) If you don't mark the hole you punched you will never find it in the fleece. Trust me on this one....

Stuffing the bottom part of the bed after I had weaved the bottom was easy as was the rest of the instructions. For the sides of the bed the instructions had you make 1/2 of the side and then stuff it with the fiberfill material. I did this but it was hard to get the stuffing even, When I did the 2nd half of the side, I stuffed as I went and that went much better.

I think I will draw up the sides more than the pattern said to do, but I believe this is individual taste.

Would I make it again? No, unless someone paid me a lot of money to do it. Am I glad I made it? Yes, very much so.


Next week I'll share with you what I did with the left over material, this time my husband benefited from it!

Saturday, January 17, 2015

Keeping Busy for Winter


So, here's what I have been up to lately.

 
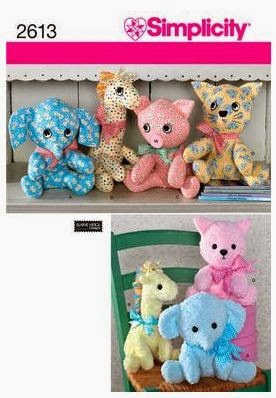
In December, I was at Joann Fabrics and I saw this beautiful material that was on sale. The only problem with it was that I had nothing in mind to make with it, so I could not justify buying the fabric. That same day at Joann's they also had a sale on Simplicity patterns. As I was looking through the pattern book, I came across a pattern that was PERFECT for that material I had an eye on. It was meant to be…. Anyway, I bought the pattern and the material and proceeded to sew.


Simplicity 2613


The material was corduroy fabric with colorful elephants printed on it and I knew it would be a nice gift for my friends who have children. I made 8 in total and gave them out right before Christmas. Here's a couple of them I made. They are so cute!


Sunday, November 10, 2013

Halloween Fingers - How I do it

Each year for Halloween I make creepy looking fingers.  I have seen some people call them witch's fingers.  To me, it's the same thing.  Something edible for Halloween, but almost too creepy to eat.


This year, I took pictures along the way so you could see the progress as I went through each step.

The cookie dough is nothing more than a shortbread cookie recipe.  Sugar, flour, butter, Vanilla extract & some Almond Extract.  Nothing fancy here!  Oh, and I did add some cinnamon, blanched almonds & slivered almonds in strategic places.  More on that later.

And here's how I did it.

I started out with a spoonful of dough and rolled it into a log between my hands.  I had to adjust the amount of dough I used, but I finally had the 'eye' for it and turned out some consistent shapes.

Now I have added the blanched almonds.  All you need to do is take a handful of raw almonds (with skin on) boil them in water for a little while, drain, slip the skin off and split them.  They have this nice pasty white coloring, with ridges and some of them are a bit chipped too.  Perfect!

Here I have added the knuckles.  Just take a knife and make 3 slashes in the cookie for each knuckle.  They are really starting to look like fingers now.

A close up

Halloween fingers can't dig their way out of graves without getting dirt on them can they?  I brushed cinnamon on them to give that dirt appearance.  And I'm not even done yet....

Another close up

Slivered almonds.  What do you use them for?  I'll betcha don't use them as bones coming out of the fingers. (Presumably when they were ripped off the hand)  I couldn't use all the slivered almonds as I had to pick the longest ones.  The leftovers will go in a stir fry or something.

Well, they don't look like actual bones, but close enough.  We don't want to get too realistic here.

A little red food coloring and Voila!  It's starting to get creepy.

Here they are before I put them in the oven for baking in all their creepy glory.

They flattened out more than I wanted, which indicates I didn't have enough flour in the recipe.  Something I'll have to keep in mind for next year.  On the positive side, they almost look like they are decomposing.

The red you see around the fingernails was red frosting I put on the fingers before I baked them.  It turned out nicely, so I'll probably do the same thing next year.

Another closeup for you

Overall it took me about 2 hours to do this.  If you are making these cookies with someone else, it shouldn't take as long.

They were a big hit at work, and as usual I had some left over at the end of the day because the majority of people couldn't bring themselves to eat the fingers.  My husband didn't have a problem eating them, but since he's retired from the US Marine Corps, it doesn't surprise me.


Wednesday, October 9, 2013

Let's Get Ready To Rumble! - First show of the season

OK, I'll admit it wasn't a big show, but since I was horribly sick and missed doing any shows last winter, this was a good one to start with.  It was a small show, inexpensive to attend and it was close to home.  A perfect combination.  Oh, and as an added bonus, the weather wasn't too bad either.  Not perfect, but not bad.

This was the first show where I had both my dichroic pendants and soap for sale.  I took some pictures to document this auspicious occasion.  

Also, if you are interested, I have my show schedule posted on my web site so stop by if you can!


Here is a display of my soap.  In the front you see my glycerin loofah soap and on the right is my 'Bag of Bones' soap.  The other soap you see in the back is the other soap I have made.  So far the Lavender Vanilla soap is my best seller.

A closeup of the loofah soap.

After looking at my Bag of Bones soap on the white table cloth I realized it was not easy to see so I put it in one of my jewelry trays.  The soap in the front is two separate pieces and the soap in the back has the skull and crossbones embedded in glycerin soap.  I called it "Buried Bag of Bones."

Here's a distance shot of the soap table setup.

The pendants I make.  As an added bonus, I caught my husband in the picture too.

Another angle

On to the next show!


Monday, September 23, 2013

Loofah Soap - So Ingenious!

As some of you know I have been dabbling in soap making.  I saw a YouTube video of how to make Loofah Soap, so I thought "Why not give it a try?"  So I did the loofah in the Pringles can thing and it was not exactly the way I wanted it to go.  

This weekend I tried it again with what is called "Melt & Pour" soap.  It is exactly as advertised.  You melt it in the microwave and pour it into molds, but in my case it was PVC pipe. Take a look at the pictures below.

Here are my PVC tubes filled with the loofahs and soap.  I do have end caps on the bottom of the tubes, but I wanted to make sure they were sealed tight, so I duck taped them.  The red thing on the right is a mold I used for the leftover soap.

Here is a top view of the tube.  I didn't want to make them too full and you can clearly see the loofah here.  The little "ice" looking pieces are the soap that did not melt completely.  Darn things!  I didn't see them in the mix.

Another view of the top of the tubes.  The green soap is Grapefruit fragrance and the blue is "Sea of Love."  It's a nice light fragrance.  You can see a little bit of my LOVE Scrabble Tile soap on the rack too.

Here a tube is upside down.  I have taken the duck tape off and have pried open the end cap.  I had to use a flat head screwdriver because of the suction on that end.  By the way, before I added the loofahs & poured the soap in the mold I sprayed it down with butter spray.  I hoped this would make it slide out of the mold.  I read somewhere on the internet that it would work and then I could take a regular veggie can (unopened) and push up from the bottom to get the soap out.  The can fits inside the tube with no problem.

When I opened it up I could see the spray butter, and also the darn barcode label that was on the end cap.  So once I cut them into bars, the soap ends will be used at home.

It worked!  Out of the tubes they came.  I didn't have the strength to do it, but my muscle-bound husband was up to the task.  I had to use 2 loofahs per tube, and each tube was in 2 batches.  That's why there is a little color difference.  I used some green & blue pigment powder to color the soap and it will not stain the skin or washcloth.  I made sure of that!

You can really see the color difference here.  I think next time, I'll use less color.  With it being as dark as it is, you can't see the loofahs that well.

A closeup.  By the way, the little 'crumbs' you see on the towel below the soap is actually lavender buds from other soap I made.  I've just been too lazy to clean it up.

The soap slices.  It makes a really nice pattern doesn't it?

Another view and you can see the 2 pieces that were at the top of the tubes.

Looks like I had an air pocket in one piece.

I have wrapped the soap in plastic food wrap.  My mom had a big roll left over from when she had the bar (at which I was once the head burger flipper) so I used that for the wrapping.  It worked out great!  It took me forever to design the label for these because I am so anal about things.  I swear it took me as long to do the label as it did to melt and pour the soap. I'm happy with the results though.

Glamour shot

Another glamour shot
I wanted to get this soap made in time for my show coming up next month  It should give me an indication of whether the soap is worth making.  If it is I plan to make more.  I'll be pricing them at $6.00 each or 4 for $20.00.

Sunday, August 25, 2013

Triple L - Not so bad after all

You know, I was not exactly looking forward to slicing the soap I made last weekend, but the time had come for me to take a closer look at my handiwork.

As it turns out, the results weren't as bad as I feared.  So, with that in mind I am going to say that I don't make mistakes, I just take artistic license.....

Here are the results.

Here are the slices of the multicolored soap.  They'll take about 4 to 5 weeks to cure

A closer look - Yeah, I think I would use it!


My biggest surprise was the loofah soap.  Wow!  It looks like a flower in the middle doesn't it?

Here is a closeup of the 'top' of the soap.  If you remember from last week's blog, I didn't think the soap really soaked in.  So, this is fully functional as well.  By the way, I cut the soap with a serrated bread knife we don't use in the kitchen much.  It's now a permanent part of my soap kitchen.

So, after I cut the soap I was on a roll and decided I had time to fuse some glass this weekend.  I thought you would like to see pictures of some of my tools and how I have things organized.

Here you see my work surface.  
 I have my tweezers to pick up the small pieces of glass & my dichroic glass pieces in old Crystal Light containers.  I have my glass separated by color and by pattern.  I don't have the eye to immediately know what color I'm looking at when picking out the colored glass pieces.  You see, the color is opposite of what you are looking at, it's very confusing at times. It's simpler for me just to separate them after they are cut and put them into the separate containers by color.

The work surface is black because it shows the colors better when I am putting things together.  This is like a giant mouse pad and I have used it for so long that the edges are frayed.  The spots you see on it are hardened Super Glue.  Yes, I play with cut glass edges and Super Glue, but I am afraid of sky diving... Go figure!


Another angle of my work surface and some of the pieces I'll be firing.  to the right are some of my drawers I keep my cut glass pieces in and at the top of the picture are my colored dichroic glass pieces.

Here is a closeup of my colored glass pieces.  I have them in the drawer in rainbow order.  Believe it or not, the glass on the far left is all red, even though they look blue.  Now you see why I have to have the containers labeled!

Speaking of labels, yet another close up and you can see that all my containers are labeled with the COE, the brand and color of glass.

Here you see my cut glass 'collection.' The bottom drawer contains my dichroic pattern pieces, the middle drawer is my clear glass with some kind of pattern on them and the top drawer is just plain clear glass.  I have cut these ahead of time in various shapes and sizes. When I want to cap my pieces I just have to look for one I want.

A close up of my patterned plain glass pieces.

This drawer contains my dichroic glass pieces that have a specific pattern on black & clear glass.  These pieces actually have a ridged pattern on the glass with the dichroic coating over them.

Here are some of the cut colored glass pieces I use for my base.  I have them roughly separated by shape.

Another closeup

My dichroic pieces with the black & red base are the best sellers.  I do make pieces with other colors too.

Tools of the trade.  Here you see my welders gloves and timer.  I need the gloves because I don't want to burn my hands and arms when I am checking on my glass in the kiln.  When you open an oven that is over 1400 Fahrenheit you need to take precautions.  Also pictured here is my timer.  I need to keep track of how long things have been in the kiln so that I can check on how they are melting and fusing.  I wear it around my neck so I don't forget it if I am doing other things.

Here are my pieces before I fired them.  I need to keep them at least a quarter inch apart so they don't fuse together.  I want the fusing to be up and down, not sideways!

Here is the 'after' picture of the fused glass.  This is what I saw when I opened the kiln this morning.  Looking at them I think I let them fuse a bit too long, they are more rounded that what I like.  They are still usable though.  
Some of these I'll sell to the local bead store, some of them I'll give to my husband for wire wrap, some of them will be earrings or rings and the others will be pendants.  The best part is, I get to keep what I want.  Yeah, I'm selfish that way!

I hope you enjoyed looking at the pictures, now I think I'll get back to my glass.